Your client’s building security depends on RFID badges that haven’t been updated since 2015. They want you to test whether an attacker could clone employee credentials and walk right in. You’ve got a Proxmark3 and enthusiasm, but you’re missing the most basic component: a proper inventory of blank cards and tags that actually match what you’re testing.
I burned through two days on my first physical security assessment because I showed up with the wrong frequency blanks. The target facility used 125kHz EM4100 cards, and I’d packed nothing but 13.56MHz MIFARE blanks. Since then, I’ve built a standardized RFID testing lab that covers 95% of real-world scenarios. Here’s exactly what you need and how to set it up properly.
Most guides skip this part and jump straight to cloning commands. That’s backwards.
The blank card you choose must match both the frequency and chip type of your target. A 125kHz EM4100 reader won’t even detect a 13.56MHz MIFARE blank, no matter how perfectly you’ve cloned the data. And within the same frequency, different chip architectures have different memory structures—write to a MIFARE Classic 1K blank when you needed a 4K, and you’ve just wasted 20 minutes and a card.
In my experience, 80% of commercial access control systems use one of four configurations: 125kHz EM4100, 125kHz HID Prox, 13.56MHz MIFARE Classic 1K, or 13.56MHz MIFARE DESFire. Your lab needs blank inventory for all four, plus a handful of specialty tags for edge cases.
The second reason blank selection matters: you’re often working in time-sensitive scenarios. Physical pentests typically have tight windows. If you’re testing an office building’s access control at 2 AM and discover your blank cards don’t match the site badges, you can’t exactly run to the store. You need the right blanks in your kit before you arrive.
Start with 125kHz cards, these cover the majority of older systems still in production.
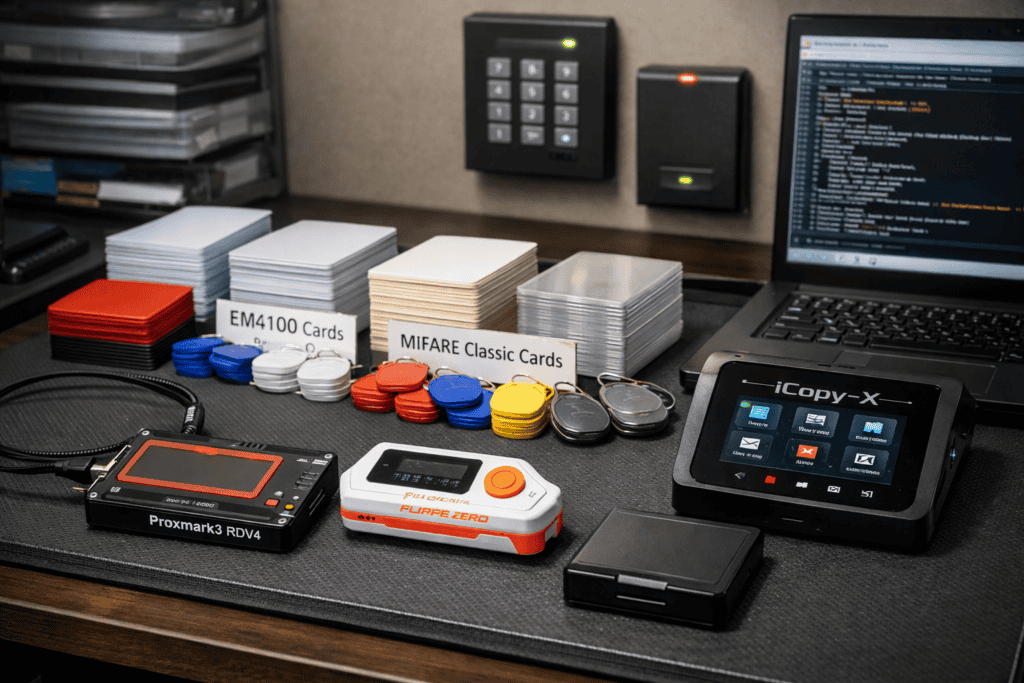
EM4100 blank cards are your workhorse for low-frequency testing. These are read-only cards that store a 40-bit ID. Most older commercial buildings, apartment complexes, and parking garages use EM4100 or compatible protocols. I keep at least 20 blank EM4100 cards in white (they look professional during demos) and another 10 in key fob format for vehicle access scenarios.
HID Prox blanks are slightly more complex. These use HID’s proprietary encoding and require specific blank cards marked as “HID compatible” or “T5577 configurable.” The T5577 chip is rewriteable and can emulate EM4100, HID Prox, and several other 125kHz formats. When I’m testing a site with unknown 125kHz cards, T5577 blanks give me flexibility to clone whatever I encounter. Keep 15-20 of these in your kit.
Move up to 13.56MHz and you’re dealing with more sophisticated systems. MIFARE Classic 1K blanks are the standard for modern access control, event badges, and public transit cards. These have 1 kilobyte of rewriteable memory divided into sectors. Buy the UID-changeable variants (sometimes called “magic cards” or “Gen2” cards) these let you clone both the data and the unique identifier, which is critical for systems that validate UIDs.
MIFARE Classic 4K blanks are identical to 1K variants but with four times the storage. Some high-security implementations store additional data (biometric hashes, time-based access rules) that won’t fit on 1K cards. I keep 10 of these for edge cases, though honestly I use them maybe twice a year.
For high-security targets, MIFARE DESFire EV1 or EV2 blanks are necessary. These use actual cryptographic authentication instead of the broken CRYPTO1 cipher that Classic cards rely on. DESFire implementations are much harder to attack, and cloning often requires exploiting implementation flaws rather than direct card cloning. Still, you need compatible blanks if you manage to extract keys or find a vulnerable reader configuration.
You can’t test RFID security with only blank cards and hope. You need reading and writing hardware that actually works.
The Proxmark3 RDV4 is the gold standard for serious RFID research. I’ve used the Proxmark3 Easy and other budget clones—they work, but the RDV4’s extended antenna gives you better read range and more reliable writes to stubborn cards. The standalone LF (low frequency) and HF (high frequency) antennas cover both 125kHz and 13.56MHz ranges without swapping hardware. Get the version with the battery mod if you’re doing fieldwork; being tethered to a laptop during physical assessments is annoying.

The Flipper Zero gets a lot of hype, and honestly it’s earned. For quick field reads and cloning simple cards, it’s faster than booting up the Proxmark3 software suite. The Flipper handles EM4100, HID Prox, and MIFARE Classic cloning through its interface in under 30 seconds. I use it for initial reconnaissance—scan badges during social engineering approaches or test cards found in dumpsters near target facilities. When you need deeper analysis or you’re attacking hardened implementations, switch to the Proxmark3.
One tool that doesn’t get enough attention: the iCopy-X handheld cloner. This thing is dead simple—place original card on one side, blank on the other, press the button. It handles EM4100 and MIFARE Classic 1K cards with zero configuration. I keep one in my physical pentest kit for scenarios where I need to clone a card in under 10 seconds, like when a friendly employee lets me “borrow” their badge for a moment during pretexting. The iCopy-X isn’t sophisticated, but speed matters during social engineering. You can grab the iCopy-X from wai-works.com’s access control tools category alongside proper blank card inventory.
You’ll also want a basic USB RFID reader for initial card identification. The generic $15 ones on Amazon work fine for determining whether you’re looking at a 125kHz or 13.56MHz card before you pull out the serious hardware.
I learned this the hard way: label everything. Use a label maker or permanent marker to identify card types before you write anything to them.
Store blank cards by frequency and chip type in separate bags or compartments. My current setup uses a small parts organizer with labeled drawers:
Keep cloned cards separate from blanks. During one assessment, I accidentally grabbed a cloned badge from a previous client and nearly created a cross-contamination nightmare. Now I use different colored cards for blanks (white) versus cloned cards (colored), and I wipe cloned cards immediately after completing assessments.
Document your inventory in a simple spreadsheet. Track card type, quantity, purchase date, and which assessments used which blanks. This helps with budgeting and ensures you don’t run out of critical card types mid-project.
YouTube Embed Placeholder
Title: “Proxmark3 Complete Guide: RFID Hacking from Beginner to Advanced” Creator: HackerSploit URL: https://youtube.com/watch?v=PLACEHOLDER
Search for this video and embed it in WordPress
Here’s my standard workflow for access control assessments.
Step 1: Identify the target card. Use the Flipper Zero or Proxmark3 to read the card frequency and type. For 125kHz cards, run lf search on the Proxmark3 or use Flipper’s “Read” function in the 125kHz RFID menu. For 13.56MHz, use hf search or Flipper’s NFC read function.
Step 2: Extract the data. For EM4100 cards, you’re just grabbing the 40-bit ID—trivial. For HID Prox, you need the facility code and card number. For MIFARE Classic, you need to dump all sectors, which requires recovering the sector keys first. The Proxmark3’s nested attack (hf mf nested) works on most MIFARE Classic implementations. Budget 5-10 minutes per card for key recovery and full memory dumps.
Step 3: Select the correct blank. Match frequency, chip type, and memory capacity. For UID-sensitive systems, ensure your blank supports UID modification (Gen2 cards).
Step 4: Write to the blank. For EM4100, use lf em 410x clone with the captured ID. For MIFARE Classic, write the dumped sectors using hf mf cload followed by hf mf csetuid if you need to change the UID. Verify the write with another read—I’ve had blanks that accepted the write command but actually stored garbage data.
Step 5: Test immediately. If you’re on-site, test the cloned card against the target reader before leaving the area. Off-site lab testing is great for practice, but real-world readers sometimes behave differently than your test equipment.
Buying cheap blank cards from random vendors is a gamble. I’ve received batches of “MIFARE Classic” blanks that were actually cheaper NTAG chips with incompatible memory layouts. Stick with reputable suppliers who specify exact chip models, or buy from specialized security tool vendors who understand what pentesters actually need.
Not all UID-changeable MIFARE cards are created equal. Gen1A cards (also called “magic cards”) respond to special backdoor commands that some readers can detect. Gen2 cards (sometimes labeled as “DirectWrite”) are harder to detect but require more complex write procedures. For high-security assessments where readers might implement anti-cloning checks, use Gen2 blanks exclusively.
Forgetting about sector access keys will waste your time. MIFARE Classic cards use two keys per sector (A and B) to control read and write access. Default keys work maybe 60% of the time. For hardened implementations, you’ll need to attack the cryptographic implementation using darkside or nested attacks. Keep a dictionary file of common keys on your Proxmark3—this speeds up testing significantly. The MITRE ATT&CK framework covers credential dumping techniques under T1555.005 that apply to physical access control attacks.
Building an RFID cloning lab is perfectly legal for security research and authorized penetration testing. Actually using cloned credentials without explicit written authorization is where things get criminal.
Always maintain a clear chain of custody for cloned badges. When a client provides you with test badges or when you clone employee credentials during an authorized assessment, document who provided the cards, when, and what you’re authorized to test. I include this in my engagement letters and get signatures from both the client and any employees whose badges are involved.
Never keep cloned credentials after an engagement ends. Wipe all cloned cards, delete dumped data from your Proxmark3, and document the destruction in your final report. Some regulations (particularly in government and healthcare sectors) have specific requirements for handling physical access credentials, even in testing scenarios.
For training and personal research, only clone your own cards or use purpose-built test cards. There are plenty of intentionally vulnerable RFID training cards designed for learning cloning techniques without any legal ambiguity.
Once you’ve got basic cloning down, expand your lab’s capabilities.
Add RFID-blocking materials for testing card skimming scenarios. Faraday bags and RFID-blocking sleeves let you demonstrate how easy or difficult it is to read cards while they’re still in someone’s wallet or pocket. Most commercial RFID-blocking products are garbage—actual testing reveals which ones work.
Build a test access control system. Mount a cheap RFID reader connected to an electric strike and test your clones against real hardware instead of just card readers. This reveals implementation issues that pure card-to-card cloning misses. You’ll discover readers that check UID formats, readers with timing-based replay attack detection, and readers vulnerable to relay attacks.
Invest in a test card collection covering different encodings and security features. Cards with custom sector keys, cards with anti-cloning features, cards using proprietary protocols—having reference cards helps you understand what you’re up against during assessments. I’ve built a collection of about 30 different card types over five years, and it’s saved me countless hours of research when encountering new implementations.
The Proxmark3 RDV4 I mentioned earlier is available at wai-works.com with same-day UK shipping, along with a solid range of blank cards and tags. Having both the hardware and proper blank inventory from one supplier eliminates the common headache of mismatched components.
Blank cards don’t last forever, especially the rewriteable ones.
T5577 and MIFARE Classic blanks have write cycle limits. Manufacturers typically spec these at 100,000 writes, but in practice, heavy testing can degrade cards faster. I’ve had blanks fail after a few hundred write cycles when I’m testing new exploitation scripts. Keep surplus blanks on hand and retire cards that start throwing write errors.
Store blank cards away from magnetic fields and RFID readers. I made the mistake of leaving a stack of blanks on top of a powered Proxmark3 overnight—half of them got partially written with random data. Use anti-static bags if you’re transporting cards, and keep them in a drawer or case when not in use.
Track which blanks you’ve used for which tests. During malware research or adversarial testing, you might intentionally write malicious data structures to cards to test reader firmware vulnerabilities. Don’t mix these cards back into your clean blank inventory. I use colored blanks for adversarial testing and white blanks for standard cloning work.
Clean your readers regularly. Card readers accumulate dust and debris that causes read errors. A simple compressed air blast every few weeks keeps your Proxmark3 antennas working reliably. I learned this after spending an hour troubleshooting what I thought was a bad blank card when really my antenna contacts were just dirty.
If you’re building an RFID testing capability for a security team, standardization matters.
Create a shared inventory system so team members know what blanks are available and which are in use. We use a simple checkout system—grab cards from the supply, mark them as “in use” with your name and project code, return them to “clean blank” inventory after wiping (or move them to “archive” if they contain notable findings worth preserving).
Document your testing procedures in a team wiki or runbook. When multiple people are using the same Proxmark3 and blank card inventory, consistent procedures prevent mistakes. Our runbook covers card identification, appropriate blank selection, cloning procedures for each card type, and cleanup procedures.
Invest in multiple Proxmark3 devices if you’re running concurrent assessments. We have three RDV4 units and two Flipper Zeros shared across a team of six physical security testers. This prevents bottlenecks during busy assessment periods and ensures everyone has access to tools when needed.
Can I use any blank white card for RFID cloning? No—blank cards must match both frequency (125kHz or 13.56MHz) and chip type of the target. Generic white cards might be any protocol or completely non-RFID. Buy blanks specifically labeled with chip types like EM4100, T5577, or MIFARE Classic.
How many blank cards do I need to start an RFID testing lab? Start with 20 EM4100 blanks, 15 T5577 configurable blanks, 25 MIFARE Classic 1K UID-changeable cards, and 10 MIFARE Classic 4K cards. This gives you enough inventory for multiple projects while covering the most common access control implementations.
What’s the difference between Gen1A and Gen2 MIFARE magic cards? Gen1A cards respond to special backdoor commands that some modern readers can detect as clones. Gen2 cards don’t respond to these commands and are harder to detect, but require different write procedures. For professional pentesting, always use Gen2 blanks.
Do blank cards expire or degrade over time? Cards don’t expire, but rewriteable blanks (T5577, MIFARE Classic) have write cycle limits around 100,000 writes. In practice, heavily tested cards can degrade faster. Store cards away from magnetic fields and RFID readers to prevent accidental writes or data corruption.
The difference between a functional RFID testing lab and an expensive paperweight collection comes down to having the right blank cards matched with capable hardware. I’ve watched too many new pentesters buy a Proxmark3, order random “blank RFID cards” from Amazon, and then wonder why nothing works.
Start with a proper blank card inventory covering the four common frequencies and chip types. Add a Proxmark3 RDV4 or Flipper Zero for reading and writing. Practice on your own credentials first—office badge, apartment key fob, gym membership card. Once you’re comfortable with the workflow from identification through cloning and testing, you’re ready for actual client assessments.
Check out the complete RFID testing kit options at wai-works.com to build your lab with properly matched components instead of piecing together incompatible gear from random suppliers.
