You’re standing outside a client’s office at 6 AM, authorized engagement letter in your bag, staring at their supposedly secure RFID badge system. The security assessment scope explicitly covers physical access controls. This is where the Flipper Zero earns its place in your toolkit. I’ve cloned hundreds of RFID credentials during authorized penetration tests, and the Flipper makes what used to require a backpack full of Proxmark gear fit in your pocket. This guide walks through the complete RFID cloning workflow, from identifying card frequencies to writing clones that actually work at the reader.
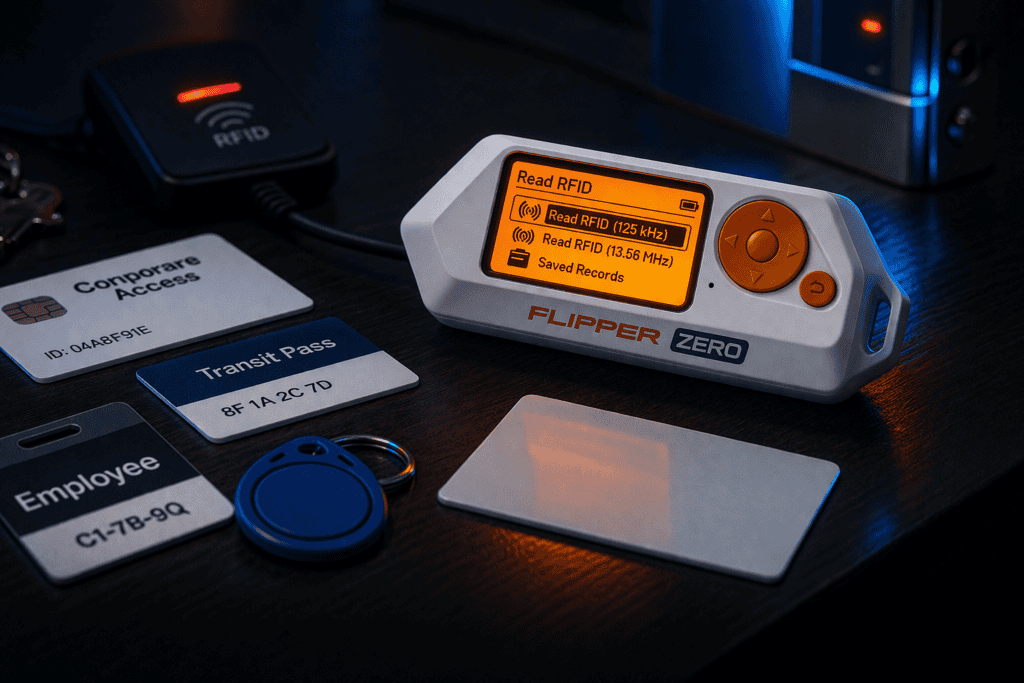
Before you read a single card, you need to understand what you’re actually targeting. RFID access control operates on two primary frequency ranges, and your Flipper Zero handles both.
Low Frequency (125kHz) cards are the older standard. These include HID Prox, EM4100, Indala, and similar technologies. They’re passive devices with no encryption, making them trivially easy to clone. When you wave your work badge and hear that single beep, you’re probably looking at 125kHz. I still encounter these systems everywhere from small businesses to surprisingly large corporate offices. The read range is typically 2-4 inches, though I’ve pulled reads from 8 inches with the Flipper’s antenna positioned correctly.
High Frequency (13.56MHz) cards are the modern replacement. MIFARE Classic, DESFire, NTAG, and iClass fall into this category. These have more memory, faster communication, and some include cryptographic protections. The key word is “some.” MIFARE Classic uses CRYPTO1, which was broken years ago. I can clone most MIFARE Classic cards in under 60 seconds with default keys. DESFire and iClass SAM are different stories requiring considerably more effort.
The Flipper Zero can read and emulate both frequencies. The 125kHz antenna is built into the device body. The 13.56MHz antenna wraps around the screen. When you’re field testing, knowing which frequency you’re dealing with saves time. Hold the Flipper flat against the card and try 125kHz first. No read? Switch to 13.56MHz. The device makes this dead simple with the “Read” function that auto-detects card type.
Fresh out of the box, your Flipper Zero needs firmware updates and some quality-of-life improvements before you’re running efficient RFID assessments. I learned this the hard way during an engagement where I showed up with stock firmware and spent 30 minutes troubleshooting issues that Unleashed firmware fixed months prior.
Connect your Flipper Zero to your computer via USB-C. The official mobile app (qFlipper) handles firmware updates cleanly. Stock firmware works fine for basic cloning, but custom firmware like Unleashed or Xtreme adds features you’ll actually use. Extended sub-GHz ranges, additional RFID protocols, and better dictionary files for MIFARE attacks all live in custom builds.
For RFID specifically, you want an updated dictionary file. The Flipper uses dictionary attacks against MIFARE Classic cards by trying known default keys. Stock firmware ships with maybe 1200 keys. Community dictionaries have 10,000+. Drop an expanded dictionary into the SD Card/nfc/assets/mf_classic_dict_user.txt file. I pulled a comprehensive one from GitHub (Flipper-IRDB repository) that’s caught default keys on cards from three different continents.
Physical preparation matters too. Clean your Flipper’s screen area where the 13.56MHz antenna sits. Grimy screens reduce read range. I keep a microfiber cloth in my kit because trying to read a card through fingerprint smudges and pocket lint is miserable. The 125kHz antenna runs through the device body, so that’s less sensitive to surface contamination, but keep the whole unit reasonably clean.
Battery life during RFID work is excellent. I’ve run 8-hour assessment days on a single charge while constantly reading cards. The active reading draws minimal power compared to sub-GHz transmissions or IR blasting. Still, charge it the night before. Nothing kills engagement momentum like a dead Flipper when you finally get the target card in hand.
The actual read process is straightforward. The analysis afterward determines whether you’re going home with a working clone. Navigate to RFID or NFC on the Flipper’s main menu depending on your target frequency. Select “Read” and hold the card flat against the device.
For 125kHz cards, you’ll see an almost instant read. The screen displays the card type (HID Prox, EM4100, etc.), the facility code, and card number. Save this immediately. The Flipper stores it in internal memory or SD card. I’ve lost reads by fumbling through menus without saving first. Hit the center button, name it something useful like “ClientName_Door3_Badge,” and save.
EM4100 and HID Prox cards show you everything you need in that first read. The data isn’t encrypted. What you see is what you clone. I tested this against my own office’s HID system by reading my legitimate badge, writing it to a blank 125kHz card, and using that clone to enter the building. Worked perfectly. The system never knew the difference.
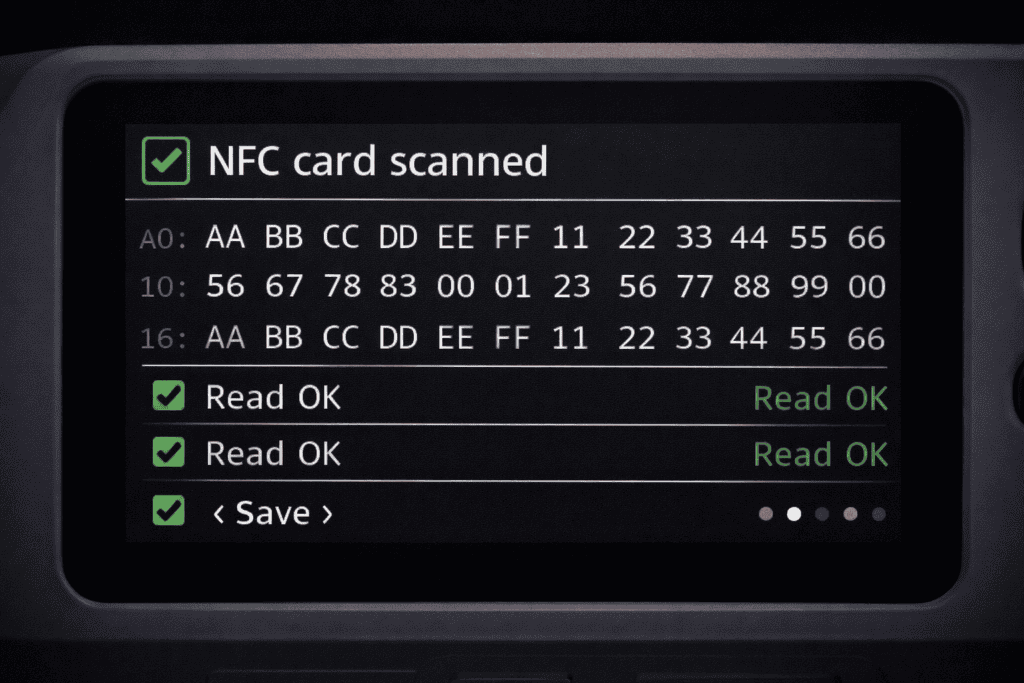
13.56MHz cards require more steps. When you read a MIFARE Classic card, the Flipper attempts dictionary attacks against each sector. You’ll see “Reading” with a progress bar as it tries keys. If your dictionary is comprehensive and the card uses default keys, you get a full dump. Save this. If sectors remain locked (shown as “???” in the hex dump), you’re dealing with custom keys.
iClass and DESFire cards display basic UID information but encrypted sector data stays encrypted. The Flipper can’t break strong crypto. You can still emulate the UID for some systems that only check the card serial number, but any system checking encrypted data will reject your emulation. I’ve encountered both scenarios in real assessments. Always test your clone before declaring success.
You’ve got the read saved. Now you need blank cards that match the original’s specifications. This is where people screw up. You can’t write a 125kHz EM4100 credential to a 13.56MHz MIFARE blank. Frequency and protocol must match.
For 125kHz cloning, grab T5577 writable cards. These are the universal blanks for low frequency work. The Ultimate RFID Blank Tag Pack includes T5577s alongside 13.56MHz options. I keep a stack of 20 blanks in my kit because engagement scopes expand and you’ll need extras. T5577 cards can emulate EM4100, HID Prox, Indala, and most other 125kHz formats.
Writing is simple. Go to your saved RFID file, select “Emulate,” then “Write.” Hold a T5577 blank against the Flipper. The device writes the credential and verifies. Takes maybe 5 seconds. You now have a working clone. I test every clone immediately against a reader if possible, or at minimum verify the write by reading the blank card to confirm it matches the original dump.
13.56MHz cloning depends heavily on card type. MIFARE Classic 1K blanks are cheap and plentiful. These use the same CRYPTO1 protocol as originals. Writing a fully-dumped MIFARE Classic is identical to the 125kHz process. Load the saved file, select Write, hold the blank card against the screen area, wait for verification. Done.
Here’s the catch with MIFARE: you need ALL sectors dumped to write a functional clone. If your dictionary attack only pulled 12 of 16 sectors, writing that partial dump creates a broken card. The missing sectors mean missing authentication data. Some systems only check specific sectors, so a partial clone might work, but that’s luck, not methodology. During assessments, I document partial dumps and note that full cloning wasn’t achieved without additional effort.
UID-only cards are a different animal. Some access control systems only verify the card’s unique identifier without checking encrypted data. For these, the Flipper’s emulation mode works without writing to a blank. Just hold the Flipper up to the reader while emulating the saved UID. I’ve opened doors this way, but it’s a gamble. Modern systems check more than just UID.
MIFARE Classic cards that resist standard dictionary attacks need more sophisticated approaches. The Flipper Zero supports nested authentication attacks, which exploit the CRYPTO1 weakness to derive keys from known sectors.
Here’s how nested attacks work: if you’ve successfully read even one sector using a default key, the Flipper can use that authenticated session to attack other sectors. Navigate to the saved MIFARE file, select “Detect Reader,” then hold the card against an actual reader while the Flipper analyzes the authentication exchange. This captures timing and response data used to calculate unknown keys.
I ran a nested attack during a corporate assessment against a card with custom keys in sectors 4-7. Took about 90 seconds of computation after capturing reader communication. The Flipper displayed the recovered keys, I re-ran a full read with the updated key database, and suddenly had all 16 sectors dumped. That card became a perfect clone.
Be patient with dictionary attacks. A 10,000-key dictionary takes longer to process than a 1200-key one. On modern Flipper firmware, a full MIFARE Classic 1K scan with a large dictionary runs 2-3 minutes. That’s acceptable during an authorized assessment. In a red team scenario where you’ve got 30 seconds of physical access, you need smaller, targeted dictionaries with the most common keys first.
Some penetration testers carry a Proxmark3 for situations where the Flipper can’t crack a card. The Proxmark has more sophisticated attack capabilities including hardnested attacks for particularly stubborn MIFARE implementations. But honestly, I’ve hit maybe 5% of cards that the Flipper couldn’t handle with proper dictionaries and nested attacks. For that 5%, you either escalate tools or document it as a control that’s actually working correctly.
The Flipper Zero offers two paths: writing physical clone cards or emulating credentials directly from the device. Both have tactical applications in security testing.
Physical clones are permanent and covert. Once written, a cloned badge looks identical to the original. You can hand it to a team member, leave it in a test scenario, or use it without pulling out obvious pentesting hardware. During physical security assessments, I write clones to blank cards that match the client’s badge form factor. If they use clamshell HID cards, I write to clamshell blanks. If they use key fobs, I write to T5577 key fobs. The goal is a clone that passes visual inspection.
Emulation is fast and flexible. You can cycle through multiple saved credentials in seconds without carrying a stack of cloned cards. I use emulation during initial testing to see what works. Read 5 different badges, emulate each one at the target reader, note which grants access. Then write the successful credential to a physical clone for actual use.
Emulation has limitations. You’re holding a bright orange pentesting device against the reader. That’s conspicuous. Some readers also reject emulation due to timing differences or anti-cloning features that detect non-card presentations. I’ve encountered readers that work fine with physical clones but refuse Flipper emulation, likely due to response timing validation.
Battery consumption matters for extended emulation. If you’re running surveillance on access patterns and emulating a badge every 15 minutes for 6 hours, you’ll drain the battery faster than just carrying a written clone. Physical clones draw zero power because they’re passive RFID devices powered by the reader’s field.
My standard workflow: read, analyze, emulate to test, then write to physical clone if the engagement requires leaving hardware in place or multiple team members need access. This covers all scenarios efficiently.
The Flipper Zero dominates for versatility, but the Chameleon Ultra specializes in RFID emulation with features the Flipper can’t match. I carry both on engagements where advanced card emulation is critical.
The Chameleon Ultra RFID Emulator stores up to 8 card slots that you can switch between via button presses or Bluetooth app. Each slot holds a complete card emulation including UID, data sectors, and authentication keys. This matters when you’re testing multiple access points with different credentials. Program all 8 slots with different cloned badges, then cycle through them instantly without menu navigation.
Chameleon Ultra also handles UID modification on-the-fly. Some systems blacklist specific card UIDs. With the Chameleon, you clone a valid card but randomize the UID to evade blacklists while maintaining valid sector data. The Flipper can’t do this dynamically. You’d need to write multiple physical clones with different UIDs.
Where Flipper wins is ecosystem integration. Reading a card, analyzing the data, and writing clones happens on one device with clear UI feedback. The Chameleon requires pairing with your phone for configuration, which adds steps. During fast-moving red team engagements, I want the simplicity of the Flipper’s integrated workflow.
Cost factors in too. A Flipper Zero runs around £169. The Chameleon Ultra is cheaper at roughly £40-60 depending on vendor. If your entire security practice is RFID-focused, grabbing a Chameleon makes sense. For general pentesting where RFID is one capability among many, the Flipper’s Swiss Army knife approach wins.
I tested both devices against the same HID Prox system. Both read and emulated perfectly. Against MIFARE Classic with default keys, both pulled full dumps. The Chameleon was slightly faster switching between 4 different stored credentials, but the Flipper’s larger screen made analyzing hex dumps easier. Pick the tool that fits your engagement style.
This matters more than the technical details. RFID cloning sits in legally murky territory depending on jurisdiction and intent. In authorized penetration testing, you’re covered by your engagement agreement. Without authorization, you’re potentially violating computer fraud laws, access device statutes, or anti-circumvention regulations.
Always get written authorization before touching a client’s RFID system. The statement of work should explicitly mention physical access control testing, RFID analysis, and badge cloning. I’ve been asked to produce engagement letters by building security, law enforcement, and once by an extremely paranoid facilities manager who thought I was corporate espionage. Having that paperwork saved me every time.
Scope boundaries are critical. If the engagement covers Building A but not Building B, don’t test Building B’s badge readers even if you successfully cloned a credential that works on both. Stick to scope. Document everything you test, every card you read, and every clone you create. This documentation protects you if questions arise later.
Physical security is different from network pentesting. You’re in meatspace where people can see you doing suspicious things with unknown devices. I’ve had security guards approach me while testing door readers. Stay calm, explain you’re authorized security testing, show paperwork. Most guards appreciate the heads-up. Some clients provide you with a letter to show security staff. Request this during scoping.
Return or destroy all cloned badges at engagement completion unless the client explicitly requests you retain them for retesting. I physically destroy clone cards by cutting them into pieces and document the destruction. Some clients want to keep clones for training their security teams. Get that in writing.
The legal status of owning an RFID cloner varies globally. In the UK, possession isn’t illegal but unauthorized use absolutely is. Know your local laws. Don’t cross international borders with a bag full of cloned access badges and pentesting tools without researching customs regulations. I’ve heard horror stories about confiscated gear and lengthy questioning.
Even with proper technique, you’ll hit problems. Here’s what I’ve encountered and how I fixed it.
Card won’t read: Check frequency first. Toggle between 125kHz and 13.56MHz modes. If still nothing, the card might be damaged or use an unsupported protocol. I’ve found cards with broken antennas that looked fine externally but couldn’t be read by any device. Also verify your Flipper’s firmware is current. Older builds had issues with certain iClass variants.
Partial MIFARE dump: Your dictionary is missing the custom keys used. Try nested authentication if you got at least one sector. If nested fails, you need a Proxmark3 or you document this as a properly secured card. I’ve also encountered cards with intentionally corrupted sectors that prevent dumping. These are rare but exist.
Clone doesn’t work at reader: First, verify you wrote to the correct card type. T5577 for 125kHz, appropriate MIFARE blank for 13.56MHz. Second, re-read your clone to confirm it matches the original dump. Sometimes writes fail silently. Third, some readers check more than RFID data. They might validate magnetic stripe data, visual printing, or even card thickness. Your clone has the correct RFID data but fails other checks.
Emulation works but written clone doesn’t: The reader might detect timing or physical differences between genuine cards and blanks. Some modern readers reject cheap Chinese MIFARE blanks but accept name-brand ones. I switched to higher-quality blanks and the problem disappeared. There’s also the possibility the reader uses challenge-response authentication that works during emulation (because the Flipper answers in real-time) but fails on static clones.
Flipper crashes during read: Firmware bug or corrupted SD card. Restart the device, verify SD card integrity, update firmware. I had recurring crashes on a specific version of Unleashed firmware that disappeared after updating.
The RFID protocol landscape is vast. Not every card is clonable with pocket-sized tools. During an assessment where you hit an unsupported card, document it. Explain to the client that their card uses XYZ protocol which requires ABC specialized equipment and isn’t vulnerable to basic cloning attacks. That’s often valuable information they didn’t know about their own security.
The Flipper Zero is your primary tool but not your only one. A complete RFID security testing kit includes backup hardware and consumables for sustained engagements.
Start with blank cards and tags. Buy in bulk. The Ultimate RFID Blank Tag Pack covers both frequencies with multiple form factors. I stock 50 blanks minimum because engagement scopes expand, cards fail, and clients sometimes want to keep clones for training. Key fobs, cards, and stickers give you options for different scenarios.
A card reader for your laptop is useful for verification. After writing a clone, read it with a USB RFID reader to confirm the data matches your original dump. This catches failed writes before you’re standing at the target door with a non-functional clone. I use a cheap USB 125kHz/13.56MHz reader from Amazon. It’s not a security tool, just verification.
Proxmark3 Easy or RDV4 sits in my kit for cards the Flipper can’t crack. It’s expensive (£200-400) and the learning curve is steep, but when you need it, you really need it. I’ve used the Proxmark maybe a dozen times across 100+ RFID assessments. That 10% edge case justifies the cost.
Documentation tools matter. I photograph every badge I clone, including front and back for visual details. A smartphone macro lens helps capture hologram details, printing quality, and physical characteristics that might matter if you need to create convincing physical copies beyond just RFID cloning.
Power is critical for multi-day assessments. A small USB power bank keeps the Flipper charged in the field. I prefer the 10,000mAh size because it fits in a pocket but provides multiple full charges.
Is RFID cloning with Flipper Zero illegal? Cloning RFID cards is legal when performed as part of authorized security testing with written permission from the asset owner. Unauthorized cloning or using cloned credentials to access systems without permission violates computer fraud and access device laws in most jurisdictions. Always maintain engagement documentation.
Can Flipper Zero clone all RFID access cards? No. Flipper handles most 125kHz cards (HID Prox, EM4100, Indala) and 13.56MHz cards using weak or default encryption (MIFARE Classic). Cards with strong cryptography like DESFire EV2, modern iClass SE, or government PIV cards resist cloning with consumer tools and require specialized equipment or aren’t clonable at all.
How long does it take to clone an RFID badge with Flipper Zero? Reading a simple 125kHz card takes 2-3 seconds. MIFARE Classic with a comprehensive dictionary requires 2-4 minutes for full sector dumping. Writing to a blank card takes 5-10 seconds. Total process from reading original to tested clone: 5 minutes for basic cards, 10-15 minutes for protected MIFARE.
What’s the difference between Flipper Zero and Chameleon Ultra for RFID? Flipper Zero integrates reading, analysis, and writing in one device with multi-tool capabilities beyond RFID. Chameleon Ultra specializes in emulation with 8 switchable card slots and dynamic UID modification but requires phone pairing for configuration. Flipper suits general pentesting, Chameleon excels at dedicated RFID assessment work.
RFID security testing reveals how often organizations rely on outdated access control without realizing the vulnerability. I’ve walked into server rooms, executive floors, and pharmaceutical labs using cloned badges during authorized assessments. Every time, it drives home that physical security deserves the same attention as network security. The Flipper Zero makes this testing accessible without requiring a trunk full of specialized equipment.
Your first engagement will be awkward. You’ll fumble through menus, forget to save reads, and probably write to the wrong type of blank card at least once. That’s expected. Run practice sessions against your own access cards before touching client systems. Build confidence with the workflow so you’re efficient when authorization windows are limited.
Start building your toolkit at Wai Works, where you’ll find the Flipper Zero alongside complementary tools like the Chameleon Ultra and proper blank card assortments for serious RFID security work. Browse the full range of pentesting hardware at the Wai Works shop.
