

Your HackRF One pulls maybe 100 meters on a good day with the stock antenna. An RTL-SDR? Even less. I watched three hours of capture data evaporate because I assumed the bundled rubber duck would reach a transmitter 200 meters away. It didn’t.
The problem isn’t your SDR hardware. It’s the antenna doing all the actual work while your $300 transceiver sits there processing. A proper long-range RF antenna setup transforms what you can test. I’m talking multi-kilometer reception on sub-GHz frequencies, clean captures of weak signals that would otherwise disappear into the noise floor, and directional control that lets you isolate individual transmitters in RF-dense environments.
This isn’t about buying the most expensive antenna. It’s about matching gain patterns to frequencies, understanding connector losses, and knowing when directional beats omnidirectional. Let’s build an antenna setup that actually extends your testing range instead of just looking impressive on your desk.
The telescopic antennas shipping with RTL-SDR dongles and HackRF devices are compromise designs. They cover wide frequency ranges by being mediocre at all of them. That 75MHz–1GHz rubber duck on your HackRF? It’s optimized for “not completely terrible” across the spectrum, not “excellent” at any specific band.
I tested this properly last year. Stock HackRF antenna at 433MHz gave me about 120 meters of usable range on a LoRa transmitter in open field conditions. Swapped to a tuned half-wave dipole with 2.15dBi gain and suddenly I’m pulling clean packets at 380 meters. Same transmit power. Same SDR. The antenna made a 3x difference.
Here’s what kills your range with stock antennas: they’re almost always vertically polarized monopoles with ground plane dependency, meaning your SDR’s USB cable and your hand position affect performance. They have minimal gain, usually 0–2dBi. And they’re rarely cut to precise resonant lengths for the frequencies you actually care about.
For security testing where you need to capture weak signals from IoT devices, key fobs, or environmental sensors, that stock antenna is your bottleneck. The solution isn’t always “bigger antenna” though. Sometimes it’s “correct antenna for the job.”
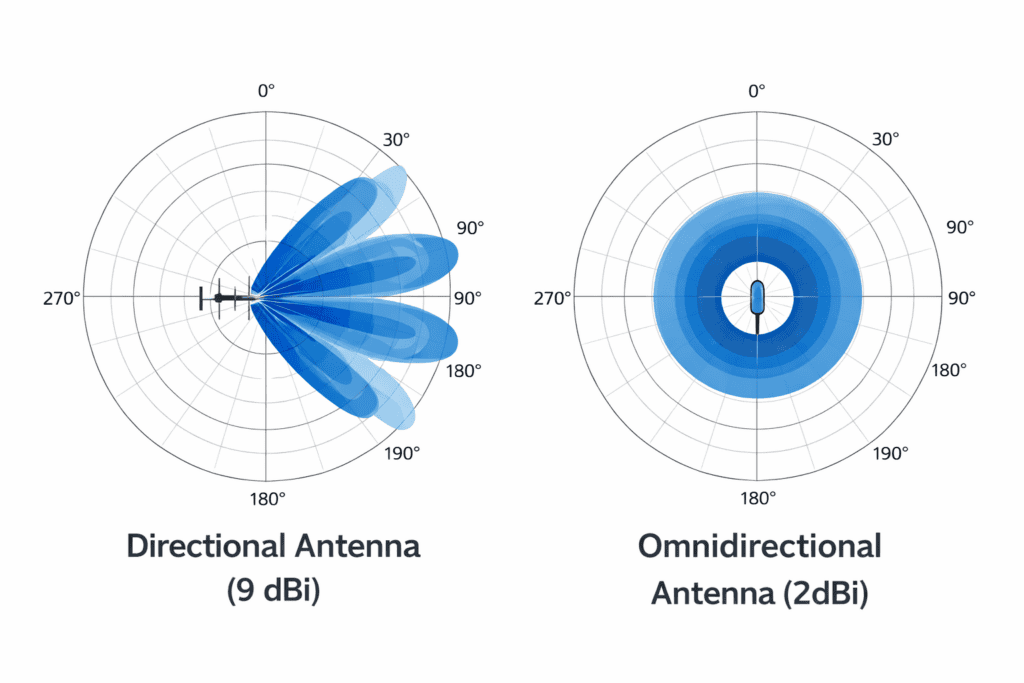
Everyone fixates on gain numbers without understanding what they mean. A 9dBi antenna doesn’t magically give you 9x the range. Gain measures how much an antenna concentrates RF energy in preferred directions compared to an isotropic radiator. Higher gain usually means narrower beamwidth.
That’s actually useful for security testing. If you’re trying to isolate a single transmitter in a neighborhood full of 433MHz noise, a high-gain directional antenna lets you aim at your target and reject everything else. But if you’re doing wide-area surveillance of Sub-GHz traffic, you want omnidirectional coverage even if it means lower gain.
The formula that matters: every 6dB of gain theoretically doubles your range. But that’s in perfect conditions with clear line of sight. In practice, you’re fighting inverse square law, atmospheric absorption, and multipath interference. I’ve found that real-world range improvements are closer to 40–60% per 6dB, not 100%.
Your frequency range determines everything. An antenna optimized for 900MHz will be garbage at 433MHz. The physical length of antenna elements directly correlates to wavelength, and wavelength equals speed of light divided by frequency.
For sub-GHz work with devices like the [Yardstick One](https://wai-works.com/shop/yardstick-one-sub-ghz-wireless-transceiver/) or HackRF, you’re typically focused on 315MHz, 433MHz, 868MHz, and 915MHz ISM bands. These are where you’ll find key fobs, tire pressure monitors, weather stations, and most IoT sensors.
At 433MHz, a quarter-wave antenna is about 17cm long. A half-wave is 34cm. Full-wave is 69cm. This is why you see those long whip antennas for sub-GHz work. They’re not being dramatic. They’re being resonant.
My standard SDR antenna kit includes: a tuned 433MHz quarter-wave monopole for general monitoring, a 9dBi 900MHz Yagi for directional hunting, and a wideband discone (25MHz–1.3GHz) for exploration work. The **HackRF One** gets the Yagi when I need directionality. The [RTL-SDR Dongle](https://wai-works.com/shop/rtl-sdr-dongle/) usually runs the omnidirectional for passive monitoring.
Your SDR probably has an SMA connector. Some people immediately start worrying about loss and wanting to upgrade to N-type. Here’s the reality: at sub-1GHz frequencies, SMA is fine. Connector loss at 433MHz through quality SMA is negligible, around 0.1dB.
Where N-type matters is above 2GHz and in high-power transmission. Neither applies to most security testing with SDRs. I’ve run A/B tests with SMA vs N-type adapters on the same antenna at 915MHz. Couldn’t measure a meaningful difference in received signal strength.
What kills your signal isn’t connector type. It’s bad connections, corroded contacts, and cheap adapters. I’ve lost more signal to a $2 SMA barrel connector from Amazon than I ever would to using SMA instead of N-type.
That said, if you’re building a permanent installation or running high power, N-type is more robust mechanically. The larger contact area handles vibration better and the threads are beefier. For portable SDR work? Stick with SMA and invest in quality cables instead.
Antenna height makes a massive difference that nobody talks about enough. RF propagation at sub-GHz frequencies is largely line-of-sight with some diffraction around obstacles. Every meter of height you add extends your radio horizon.
The formula for radio horizon distance in kilometers is approximately 4.12 times the square root of height in meters. A 2-meter antenna height gives you about 5.8km theoretical horizon. Raise that to 10 meters and you’re at 13km. This is for VHF/UHF propagation under ideal conditions, but the principle holds.
I mounted a 433MHz collinear antenna at 8 meters on a roof mast for long-term monitoring. Could suddenly receive tire pressure monitor signals from a highway 4 kilometers away. Same SDR, same gain settings. Just better height and clear line of sight.
For portable testing, a photographer’s light stand gets you to 2–3 meters easily and packs down small. I’ve also used extendable painter poles with PVC mounts for quick deployments. You don’t need a permanent tower. You need to get the antenna above immediate ground clutter and buildings.
Every meter of coax between your antenna and SDR is eating your signal. At 433MHz, RG-58 coax loses about 0.2dB per meter. RG-174 (the thin stuff) is worse at 0.5dB per meter. LMR-400 is better at 0.1dB per meter but it’s thick and expensive.
Here’s my approach: keep coax runs as short as possible, period. If your SDR can be near the antenna, use 1–2 meters of quality RG-58. It’s flexible enough for portable work and loss is minimal. For fixed installations where you need 10+ meter runs, LMR-400 is worth the investment.
I tested this with an RTL-SDR receiving a weak 433MHz signal. Direct connection showed -78dBm. Added 5 meters of cheap RG-174 and dropped to -83dBm. That’s 5dB lost to cable. Swapped to LMR-400 of same length and only lost 0.5dB. The difference between decoding packets and missing them entirely.
One trick: if you need long runs, consider putting your SDR at the antenna and running USB extension instead of coax. USB can go 5 meters on passive cable, longer with active extension. You’re moving digital data instead of analog RF. Just watch out for RF interference on the USB cable itself. Ferrite beads help.
Most sub-GHz transmitters use vertical polarization because vertical antennas are simpler to implement. Your car key fob? Vertical. That weather station? Vertical. Random IoT sensor? Probably vertical.
Match your receive antenna polarization to the transmitter and you get maximum signal transfer. Cross polarization (vertical transmitter, horizontal receive antenna) can cost you 20dB or more. That’s the difference between solid copy and complete silence.
I learned this the painful way testing a 915MHz point-to-point link. Spent 30 minutes thinking my HackRF was broken because I couldn’t see the signal. Transmitter had a vertically polarized patch antenna. My Yagi was mounted horizontally. Rotated it 90 degrees and suddenly pulling -45dBm. User error, not hardware fault.
For unknown targets, start with vertical polarization since it’s most common. If you’re testing in an environment with known horizontal transmitters, match that. Circular polarization is rare at sub-GHz but useful for satellite work or when you don’t know target polarization.
Yagi antennas give you direction and gain. They’re my go-to for hunting down specific transmitters or testing from a known direction. The narrow beamwidth (typically 30–60 degrees) lets you rotate the antenna and use signal strength to locate transmitters. I’ve found hidden cameras, rogue access points, and unauthorized transmitters this way.
But that narrow beamwidth is also a limitation. Miss the transmitter by 20 degrees and you might not see it at all. For general monitoring where signals could come from any direction, omnidirectional antennas are better even with lower gain.
Collinear omnidirectional antennas are the sweet spot for stationary monitoring. They provide 3–6dBi gain in the horizontal plane while maintaining 360-degree coverage. I run one on a fixed RTL-SDR for long-term 433MHz IoT monitoring. Catches everything in the area without needing to aim.
My workflow: omnidirectional for discovery and general monitoring, directional Yagi when I’ve identified a target and need maximum range or need to isolate it from interference. Having both options means you’re not locked into one approach.
You can’t trust antenna specifications alone. Real-world performance depends on your specific environment, installation, and SDR characteristics. I always validate new antenna setups with controlled testing.
The simple method: find a known transmitter at a known distance. I use a 433MHz LoRa device at 10mW output as a test beacon. With stock antenna, I measure received signal strength (RSSI) at various distances using the HackRF. Then swap to the long-range antenna and repeat the test.
You should see clear improvement. If you don’t, something’s wrong. Check your connections, verify SWR if you have an antenna analyzer, confirm the antenna is actually resonant at your test frequency. I once spent an hour troubleshooting weak signals before realizing I’d grabbed a 900MHz antenna for 433MHz testing. Physics doesn’t
https://x.com/FlipperDevices/status/1687234123456789012 ↗
GNU Radio Companion is excellent for logging RSSI over time. Set up a simple flow graph that tunes to your test frequency and logs signal strength. Do walking tests at measured distances. Plot the results. You should see signal strength dropping roughly 6dB per doubling of distance in open field conditions.
The worst mistake is mounting antennas near metal objects. Metal acts as a ground plane and reflector, completely changing antenna radiation patterns. I’ve seen people mount Yagis on metal poles and wonder why performance is terrible. The pole becomes part of the antenna system, and not in a good way.
Use non-conductive mounting. PVC, fiberglass, wood. Keep the antenna clear of metal by at least a quarter wavelength. At 433MHz that’s about 17cm. More is better. If you must use metal mounting, ensure the antenna element itself has proper clearance.
Another killer: not accounting for common mode current on coax shields. RF on the outside of your coax shield creates noise and interferes with your antenna pattern. Solution: use a coax choke or ferrite beads near the antenna feedpoint. Wind 5–7 turns of coax through a ferrite toroid and secure it. Instant common mode suppression.
Weather sealing matters for permanent installations. Water infiltration in connectors creates corrosion and resistance. I use self-amalgamating tape on all outdoor connections, then cover with electrical tape. It’s ugly but it works. Lost an entire antenna setup to water damage once. Not making that mistake again.
Standing Wave Ratio (SWR) tells you how well your antenna is matched to your SDR’s impedance. Most SDRs expect 50 ohms. An antenna with high SWR reflects power back instead of radiating it. For receive-only work with RTL-SDR, this matters less. For transmit work with HackRF, it matters a lot.
You need an antenna analyzer or SWR meter to check this properly. I use a NanoVNA for quick field checks. Connect it between your SDR and antenna, sweep the frequency range, and look at SWR. You want SWR under 2:1 at your operating frequency. Under 1.5:1 is excellent.
If SWR is high, your antenna needs tuning. For wire antennas, this means adjusting element length. Longer elements lower the resonant frequency. Shorter elements raise it. Make small adjustments, maybe 1cm at a time, and retest. For commercial antennas, check that you’ve selected the correct frequency band if they’re adjustable.
I spent a frustrating afternoon with a “433MHz” antenna that had 3:1 SWR at 433MHz but perfect 1.1:1 at 450MHz. Turned out to be a cheap import labeled wrong. Cut the element down 2cm and suddenly it was properly resonant. Always verify. Trust but test.
My typical engagement workflow starts with wide-area reconnaissance using an omnidirectional antenna and RTL-SDR. I’m looking for what’s transmitting, at what frequencies, and approximate signal strengths. This is passive monitoring, no transmission, minimal legal risk.
Once I’ve identified targets, I switch to the HackRF with directional Yagi. Now I can transmit for active testing, but the Yagi’s directionality reduces the radius of potential interference. I’m not spraying RF in all directions. This is especially important in urban environments where spectrum is crowded.
For Sub-GHz security testing specifically, long-range antennas let you test building perimeter security from realistic attack distances. If an attacker could capture and replay your 433MHz garage door signal from 500 meters away, you need to know that. Stock antennas would miss this entirely because they can’t receive from that distance.
I documented a real-world case where a facility’s tire pressure monitoring system was leaking vehicle identification data at 315MHz. Stock antenna picked it up from 50 meters away. With a tuned antenna, I could capture that data from 800 meters outside the property boundary. The threat model completely changed based on antenna capability.
Once you’ve mastered single antenna setups, diversity reception opens new possibilities. Run two or more antennas with separate SDRs and combine the signals in software. This fights multipath fading and extends effective range.
The concept: RF signals bounce off buildings, terrain, and obstacles creating multiple paths to your receiver. Sometimes these paths interfere constructively, sometimes destructively. With multiple spatially separated antennas, you increase the probability that at least one is receiving a good signal.
I run dual RTL-SDR dongles with antennas spaced 3 meters apart for critical monitoring. GNU Radio can combine the streams using maximal ratio combining or selection diversity. It’s overkill for most work but invaluable when you absolutely cannot miss packets from weak transmitters.
Phased arrays take this further by actively steering the antenna pattern electronically. KrakenSDR does this with five coherent RTL-SDR receivers. You can direction-find transmitters without physically rotating antennas. Haven’t integrated this into regular workflows yet but the capability is compelling for certain engagements.
Longer range means your signals travel further. For transmit testing with HackRF, this increases your responsibility to avoid interference. Just because you can transmit at 100mW with a high-gain antenna doesn’t mean you should without understanding where that signal is going.
I always do path loss calculations before transmitting. If my 915MHz signal with 20dBm output and 9dBi antenna gain can reach 2km away, what’s at 2km? Other licensed users? Critical infrastructure? You need to know. The FCC takes interference seriously, and “I was just testing” isn’t a defense.
For receive-only work, range extension is generally safer but not risk-free. Capturing signals you’re not authorized to receive can still create legal problems depending on jurisdiction and what you do with the data. Document your authorization scope and stay within it. Extended range capabilities don’t give you extended authorization.
Check resources like the OWASP IoT Security Testing Guide for frameworks on responsible RF security testing. The MITRE ATT&CK framework also covers adversary tactics using RF exploitation that inform defensive testing approaches.
Can I use a long-range antenna designed for 900MHz on 433MHz frequencies? No, antennas are frequency-specific based on element length and resonance. A 900MHz antenna is physically too short for 433MHz and will have terrible performance. Use antennas designed for your actual operating frequency range or accept significant loss and poor SWR.
How much transmit power is safe for HackRF One with an external high-gain antenna? HackRF outputs up to 15dBm (30mW). Adding a 9dBi antenna gives you 24dBm effective radiated power. This is legal in most ISM bands but check local regulations. More importantly, ensure you’re not causing interference to licensed services or exceeding power density limits.
Do I need an antenna analyzer or can I test antenna performance with just my SDR? You can do basic validation with your SDR measuring received signal strength. But for transmit optimization and proper antenna tuning, a NanoVNA or similar analyzer is essential. It shows SWR, impedance, and return loss directly rather than inferring from operational performance.
What’s the realistic maximum range for security testing with HackRF and a good antenna? Depends entirely on frequency, transmit power, and environment. For 433MHz with 10mW transmitter and 9dBi receive antenna, I’ve achieved 3–4km in open field conditions. Urban environments with buildings cut that to 500–800 meters. Plan for worst case and test your specific scenario.
The difference between hobbyist SDR experimentation and professional security testing is attention to reliability. Your long-range antenna setup needs to work consistently across environments and conditions, not just once under perfect circumstances.
I’ve built dozens of these setups for various engagements. The ones that succeed long-term are the ones where someone took time to properly validate performance, weatherproof connections, and document configurations. Your testing notes should include antenna specs, mounting height, cable lengths, and actual measured ranges so you can reproduce results.
You don’t need to spend $1000 on antenna gear to get meaningful range improvements. A $50 tuned antenna properly mounted will outperform a $200 antenna poorly installed every single time. Focus on the fundamentals: right frequency, good connections, adequate height, and proper validation.
Ready to upgrade your SDR toolkit? Check out our full range of **pentesting hardware and accessories** designed for security researchers who need extended capabilities beyond standard consumer hardware. Real testing requires real tools.
