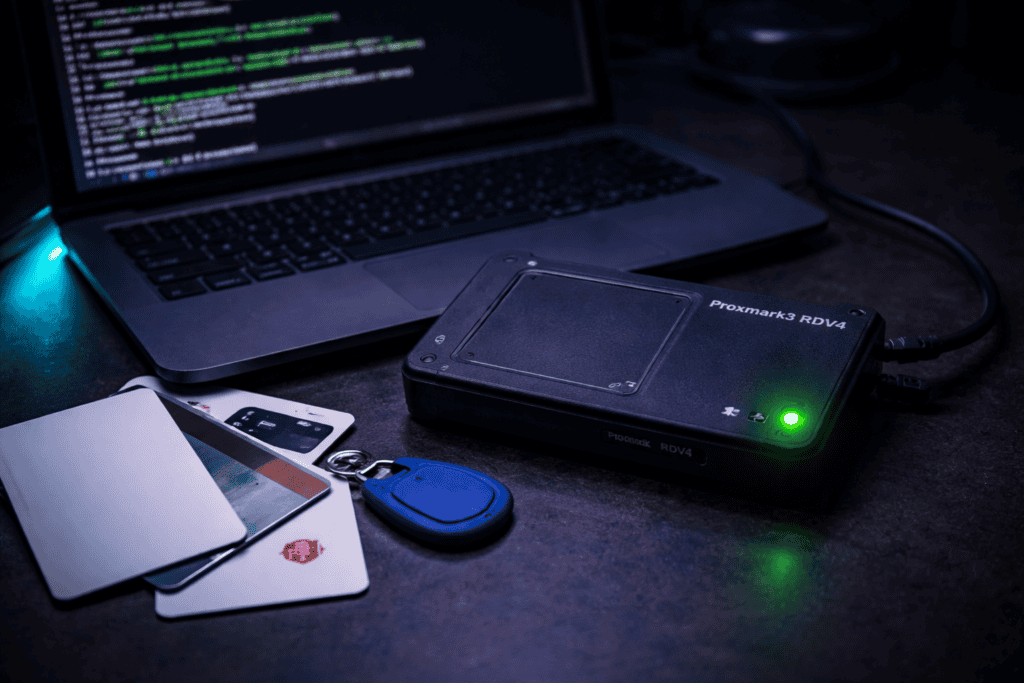
You’re standing outside a client’s office at 2am during a red team engagement. The RFID reader glows red. Your cloned badge sits in your wallet, waiting. This moment separates theory from practice. I’ve been there dozens of times, and the Proxmark3 RDV4 is the tool that makes it possible. But getting from “unboxed hardware” to “functional attack platform” isn’t obvious. Most tutorials skip the gotchas that burn hours in the field. This guide covers real Proxmark3 setup, actual RFID cloning workflows, and the NFC security testing techniques that matter when you’re on the clock.
The Proxmark3 ecosystem confuses newcomers because there are multiple versions floating around. The RDV4 variant is the current professional standard for good reason. It includes standalone mode capabilities, meaning you can clone and emulate cards without a laptop connected. That’s huge when you’re working quickly in physical spaces.
I tested the RDV4 against both the older Proxmark3 Easy and the budget Chinese clones. The difference shows up immediately in antenna performance. Low frequency cards that the clones struggle to read at 2cm work reliably at 6cm with the RDV4. When you’re trying to read a badge through someone’s wallet or jacket pocket, that range matters.
The onboard battery and standalone mode transform how you work. I’ve cloned facility access cards during social engineering assessments without ever pulling out a laptop. The device stores dumps internally, you walk away clean, extract the data later. The form factor fits in a cargo pocket. The older Proxmark3 needed constant USB connection to a laptop, which looks suspicious and limits mobility.
Build quality separates the RDV4 from cheaper alternatives too. The antenna coils are properly tuned, the case withstands field use, and the Bluetooth module actually works reliably. I bricked two clone units before accepting that the £50 savings wasn’t worth the field failures. The Proxmark3 RDV4 costs more upfront but you’re not replacing it six months later.
Fresh out of the box, the RDV4 needs firmware updated. The included version is usually months old. This tripped me up initially because outdated firmware causes bizarre behaviour where commands partially work or the device doesn’t recognise certain card types.
Connect via USB and verify detection with lsusb on Linux or check Device Manager on Windows. You should see “proxmark” or a serial device appear. If not, you’re fighting driver issues before you even start. On Windows, install the Zadig drivers. On Linux, add your user to the dialout group with sudo usermod -a -G dialout $USER then log out and back in.
Clone the official Iceman fork repository. This is critical. The original Proxmark3 repo is outdated. Iceman’s fork has active development, better card support, and the commands everyone actually uses. Run git clone https://github.com/RfidResearchGroup/proxmark3.git and compile from source following the repo instructions. Yes, this takes longer than downloading a binary, but you need the latest version for modern card support.
Flash the bootloader and fullimage with ./pm3-flash-all from the repository directory. The device reboots automatically. When it reconnects, run the client with ./pm3 and you should see the ASCII art banner and prompt. First command to run is hw version to verify everything loaded correctly. You want to see RDV4 firmware details and no error messages.
The standalone mode requires specific attention during setup. Flash a standalone mode that matches your workflow. I use HF_MSDSAL most often because it handles MIFARE Classic attacks automatically. The command is ./pm3-flash-standalone HF_MSDSAL from the repository. This lets the device run card cloning attacks while disconnected from any computer.
The Proxmark3 works across low frequency (125kHz) and high frequency (13.56MHz) ranges. Knowing which frequency your target uses saves massive amounts of time. I wasted an entire afternoon attacking a badge on the wrong frequency during my first engagement because I assumed it was MIFARE.
Low frequency cards include HID Prox, EM410x, and Indala formats. These are older technology, extremely common in legacy access control systems, and laughably insecure. They broadcast their ID in plaintext with no encryption. Reading and cloning takes seconds. The Proxmark antenna for LF has the larger coil. Hold the card against it and run lf search to identify the card type automatically.
High frequency encompasses MIFARE Classic, MIFARE DESFire, NFC tags, iClass, and dozens of other formats. These run at 13.56MHz and include varying levels of security. MIFARE Classic uses broken crypto that the Proxmark attacks easily. DESFire and iClass SE have stronger protection but aren’t invulnerable. The smaller antenna coil handles HF. Run hf search for automatic identification.
A handheld RFID frequency detector helps in the field but isn’t mandatory. I carry one because it gives instant confirmation before I start testing. You hold it near a reader, it lights up showing LF or HF, and you know which commands to queue up. Saves the awkward moment of waving the Proxmark around while nothing happens because you’re on the wrong frequency.
Card construction tells you frequency sometimes. Thick clamshell cards are almost always 125kHz. Thin credit-card format could be either. Hotel key cards are typically 13.56MHz MIFARE. Employee badges vary wildly. When in doubt, lf search followed by hf search takes ten seconds and confirms definitively.
Low frequency cloning is the gateway drug to RFID security testing. It’s fast, it works reliably, and it demonstrates impact immediately. I start every physical assessment by checking if the client uses 125kHz badges because it’s often the easiest entry point.
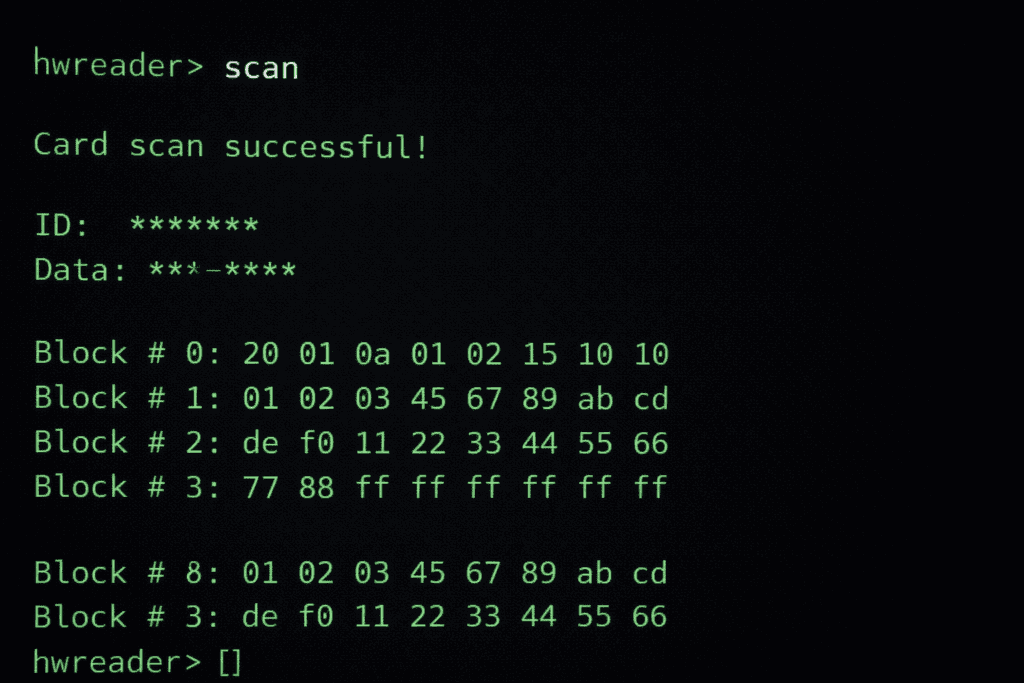
Place the card on the Proxmark LF antenna. Run lf search and wait for identification. You’ll see output like “EM410x Tag ID: 0F0368568B” or “HID Prox TAG ID: 1234abcde”. The Proxmark identifies the format automatically and displays the facility code and card number if applicable.
Read the full card data with the format-specific command. For EM410x it’s lf em 410x reader. For HID it’s lf hid reader. The device captures the transmission and shows you the raw data. Save this output because you need it for cloning.
Grab a blank writable LF card. The Ultimate RFID Blank Tag Pack includes T5577 cards that work for most LF formats. These are rewritable, so you can use the same card for multiple clones during testing.
Write to the blank card with the clone command. For EM410x: lf em 410x clone --id 0F0368568B. For HID: lf hid clone --r 1234abcde. Place the blank card on the antenna before running the command. The Proxmark writes the data and verifies it automatically. You’ll see “Clone complete” or similar confirmation.
Test the cloned card immediately. I’ve had writes that appeared successful but didn’t actually work. Hold the clone against the original reader. If it fails, rewrite it. Sometimes you need to adjust the timing or positioning during the write process. The T5577 cards are forgiving but not perfect.
MIFARE Classic 1K cards are everywhere. Employee badges, transit cards, loyalty cards, door access systems. They’re also fundamentally broken from a cryptographic perspective. The Proxmark3 exploits this beautifully.
The nested authentication attack recovers all sector keys from a MIFARE Classic card in under a minute if you have one known key. Many cards ship with default keys still active. Run hf mf autopwn and the Proxmark tries common default keys, then uses any successful key to attack the rest via nested authentication.
I watched this attack recover every key from a corporate badge in 37 seconds during a security audit. The client was shocked because they thought MIFARE was “secure enough” for facility access. It’s not. The attack is deterministic. If the card is MIFARE Classic, you will break it.
The Proxmark displays each sector key as it’s recovered. Save the full dump with hf mf dump. This creates a binary file containing all card data including access bits and value blocks. You can modify this dump, clone it to a blank card, or analyse the data structure.
Writing to a MIFARE Classic compatible blank requires Chinese magic cards, also called UID changeable cards. Regular MIFARE cards have locked UIDs. The magic cards let you write any UID, which is necessary for perfect clones. Use hf mf cload --f dumpfile.bin to write the entire dump to a magic card.
Some systems check the UID against a whitelist. Others verify sector data. Corporate badges often store employee ID numbers in specific sectors. I’ve successfully cloned badges that granted building access but failed at specific internal doors because those readers checked sector data I hadn’t captured. Always dump the entire card, not just the UID.
NFC testing with the Proxmark goes beyond simple cloning. Modern NFC implementations include anti-cloning protections, encrypted sectors, and diversified keys. Breaking these requires understanding the specific card technology.
MIFARE DESFire cards use AES or 3DES encryption with proper key management. You can’t simply read and clone them like MIFARE Classic. Instead, focus on application-layer vulnerabilities. Some DESFire implementations have weak application keys or don’t properly verify permissions. The Proxmark can fuzz the application structure with hf mfdes commands.
NFC-enabled payment cards require different approaches. EMV cards have strong cryptographic protection. You’re not cloning the card itself, but you can potentially capture transaction data during a relay attack. The Proxmark functions as a sophisticated sniffer in these scenarios. I use hf 14a sniff to capture communication between card and reader.
iClass cards, common in high-security environments, were considered secure until researchers broke the crypto. The Proxmark supports iClass key recovery attacks via dictionary attacks and known vulnerabilities. Run hf iclass dump after successfully authenticating. The attack success depends on whether the site uses default keys or has rotated them.
NFC tag manipulation is useful for red team engagements. You can write malicious NDEF records to NFC tags that trigger actions when scanned by smartphones. Create a tag that opens a phishing URL or launches an app with hf mfu commands for MIFARE Ultralight tags.
According to research published by security researchers at MITRE, relay attacks against NFC access control systems remain effective even against modern implementations because the protocols lack proper distance-bounding measures. The Proxmark can act as one half of a relay setup with custom firmware.
Theory matters less than execution in physical security assessments. I’ve seen pentesters with deep RFID knowledge fail engagements because they couldn’t operate smoothly under pressure. The Proxmark shines when you’ve practiced these scenarios.
Badge cloning during tailgating requires speed. You need to read a card, clone it, and move on before anyone notices. I practice this by timing myself: card to Proxmark, run read command, capture data, move away. My current record is 22 seconds for an EM410x card using standalone mode. In the field, you’re looking for opportunities when someone sets their badge down or stores it in an accessible bag pocket.
Insider threat scenarios where you have brief access to a legitimate card allow deeper attacks. If you can borrow someone’s badge for five minutes, you have time to dump a MIFARE Classic card completely, clone it, and return the original without arousing suspicion. This demonstrates insider risk to clients effectively.
Parking garage or vehicle access systems often use lower security LF cards because they prioritise read range over security. I’ve seen commercial parking facilities using basic EM410x tags readable from several inches away. These are trivial to capture remotely with the Proxmark’s sensitive antenna, no physical access to the card required.
The Chameleon Ultra RFID emulator complements the Proxmark for some scenarios. While the Proxmark excels at analysis and initial cloning, the Chameleon’s smaller form factor and rapid emulation switching makes it better for active use during engagements. I use the Proxmark to break the cards, then load the data onto a Chameleon for operational use.
Covert reading scenarios benefit from the Bluetooth module. Connect the Proxmark to a smartphone hidden in a bag, position yourself near targets, and control the device remotely. I’ve successfully read badges from across cafe tables this way during social engineering assessments. The laptop-free operation keeps your profile low.
Every Proxmark user hits frustrating roadblocks. I’ve lost hours to problems that had simple solutions once I knew where to look. These are the issues that consistently trip people up.
Card not detected errors usually mean antenna positioning. The sweet spot for LF is centered on the large coil with the card flat against it. For HF, you want the card’s chip directly over the small antenna coil. Some cards have the chip offset from center. Hold the card at different angles and positions while running the read command repeatedly.
Partial reads where the Proxmark sees a card but can’t fully decode it often indicate signal interference. Move away from other electronic devices. I’ve had laptop USB ports cause enough interference to prevent clean reads. Use a USB extension cable to distance the Proxmark from the computer. External displays and power supplies cause problems too.
Clone verification failures are the worst because you think you’ve successfully cloned a card but it doesn’t work. Always test clones against the actual reader before leaving the site. I carry a known-good card reader for this purpose. If the clone fails, check you’re using the correct blank card type. Writing HID data to an EM410x blank obviously won’t work.
Firmware update failures usually come from not fully cleaning previous installations. When updating, fully remove the old repository and client software before compiling new versions. Mixed versions between bootloader, firmware, and client cause bizarre behaviour. Use ./pm3-flash-all for clean updates.
Battery issues on the RDV4 appear as inconsistent operation or unexpected shutdowns during standalone mode. The battery needs periodic charging even if you’re mostly using USB power. I charge mine overnight before any field work. A dead battery during an engagement is embarrassing and prevents standalone operation entirely.
Driver problems on Windows persist as the most common setup issue. The Zadig driver installation sometimes conflicts with existing COM port drivers. Uninstall conflicting drivers completely through Device Manager, reboot, then use Zadig to install the WinUSB driver specifically for the Proxmark device.
Using the Proxmark3 for unauthorised access is illegal in virtually every jurisdiction. I include this section because the capability creates responsibility. Understanding the legal boundaries prevents career-ending mistakes.
Authorisation must be explicit and documented. A verbal “yeah go ahead and test our badges” isn’t sufficient. I require signed scope documents specifying physical security testing, the exact locations covered, and the time windows allowed. Keep these documents with you during testing because security guards don’t care about your explanation without paperwork.
Card cloning legality varies by jurisdiction, but unauthorised duplication of access credentials is illegal everywhere I’ve worked. The difference is whether you’re conducting authorised security testing or committing fraud. The Proxmark is a legitimate security tool, but intention and authorisation define legality, not the tool itself.
Some regions have laws against possessing card cloning equipment without legitimate business need. Research local regulations before carrying the Proxmark across borders. I’ve had airport security question the device. Having engagement paperwork and business documentation helps, but be prepared to explain the tool’s purpose.
Client property considerations matter during assessments. If you clone an employee’s badge, you’ve created an unauthorised access credential that exists outside the client’s control. Secure these clones carefully during the engagement and destroy or return them afterwards. Don’t keep cloned credentials as souvenirs.
The security research community has strong ethics around disclosure. If you discover a widespread vulnerability in a specific card or reader system, responsible disclosure to the manufacturer before public release gives them time to address the issue. Check out MITRE’s guidelines on coordinated vulnerability disclosure for frameworks on handling these situations.
Can the Proxmark3 clone all types of RFID cards including modern secure cards? The Proxmark3 RDV4 can clone most low frequency cards trivially and many high frequency cards with varying difficulty. Basic LF cards like EM410x and HID Prox clone in seconds. MIFARE Classic breaks reliably. Secure cards like DESFire, iClass SE, and newer encrypted formats require specific vulnerabilities or application-layer weaknesses rather than straightforward cloning.
How long does it take to learn Proxmark3 well enough for professional penetration testing? Expect two weeks of focused practice to become competent with basic operations like LF cloning and MIFARE Classic attacks. Professional-level skill across all card types and attack scenarios typically requires three to six months of regular use. The learning curve isn’t steep for common tasks, but mastering edge cases and unusual card formats takes field experience.
What’s the difference between the Proxmark3 RDV4 and cheaper RFID cloners? The RDV4 offers standalone battery operation, superior antenna sensitivity, active firmware development, and support for advanced attack techniques beyond simple cloning. Budget devices often fail with cards that have weak signals, lack support for modern formats, and can’t perform cryptographic attacks. For occasional hobbyist use, cheaper cloners work. For professional security testing, the RDV4’s reliability justifies the cost difference.
Is it legal to own a Proxmark3 for learning RFID security? Owning a Proxmark3 is legal in most jurisdictions as a legitimate security research and testing tool. Using it to clone cards without authorisation, gain unauthorised access, or commit fraud is illegal everywhere. The tool itself is legal. Your actions with it determine legality. Always obtain written permission before testing any access control system you don’t personally own.
The Proxmark3 RDV4 sits at the center of serious RFID security assessment work, but it’s part of a broader toolkit and methodology. I’ve watched my approach evolve over hundreds of engagements from fumbling with commands to smooth, repeatable workflows that deliver consistent results.
Field success comes from preparation. I keep a standardised kit with the Proxmark, charged battery, assorted blank cards, a portable reader for clone verification, and documentation templates. Before any engagement, I review the scope, research the likely card types based on the client’s industry and facility age, and prepare specific command sequences for expected scenarios.
The technical skills matter, but operational security during physical assessments matters more. Moving smoothly, having plausible pretexts ready, knowing when to abort if the situation feels wrong. These soft skills determine whether your technical capabilities translate to successful assessments or awkward encounters with security personnel.
If you’re serious about building comprehensive RFID testing capabilities, start with the fundamentals covered here and expand into specific card technologies as you encounter them. The Proxmark community is remarkably helpful. The RRG forums and Discord server answer questions fast. Document your learning process because you’ll forget command syntax faster than you expect.
Ready to build your RFID security testing capabilities? Explore professional-grade tools and blank card stock at Wai Works. Browse the full range of pentesting hardware at the Wai Works shop.
